Clickable Regions of a Picture: Image Maps
Turn the parts of one picture into separate links with an image map, measure each clickable shape in pixels, and give the same links as text for everyone the map leaves out.
Apprentice · HTML · Web Development · Updated
After this lesson you can
- Make parts of a picture into links with an image map: usemap on the img, a map with a name, and an area for each link
- Write an area's shape and coords for a rectangle, a circle or a polygon, measured in pixels from the picture's top-left corner
- Give every area alt text, and explain why image maps are rare and need the same links as text nearby
Key takeaways
- An image map makes parts of one picture into separate links. The img's usemap names a map, and each area inside the map is one clickable shape.
- usemap starts with
- coords are pixels from the picture's top-left corner. rect is left, top, right, bottom; circle is center x, center y, radius; poly is every corner's x and y.
- Every area with an href needs alt text that says where it goes, because a screen reader reads each area as a link.
- Image maps are rare today. Their spots are invisible and don't shrink with the picture, so give the same links as text nearby.
Think of a college's campus map online: click the library and you get its opening hours, click the gym and you get its class schedule. A zoo map, a theater's seating chart and an apartment's floor plan work the same way: one picture, a different link for each part of it. HTML has had a way to build that since the early web, the image map, and you'll still meet it: in older pages you're asked to update, in email newsletters, and on web certification exams, which ask about its two elements, <map> and <area>.
This lesson builds one, then is honest about why you'll rarely build a new one, because the catch is about the people an image map leaves out.
The running example is Postcards from the Coast again. Marisol drew a map of her three-day trip down the coast road, with its five stops: Gull Point Lighthouse, the sunset lookout, the tide pools, the Salty Gull taco stand and the harbor where she rented kayaks. She wants a reader to click a stop on the map and jump to that part of her post.
One picture, five places to go
Here are the two tries most people make first.
Try 1: wrap the picture in a link.
<a href="#lighthouse">
  <img src="images/trip-map.png" alt="Map of the coast road, with the trip's five stops" width="640" height="400">
</a>
Now the whole map is one link, and a link goes to one place. Click the taco stand, and you land at the lighthouse.
Try 2: cut the picture into pieces, one per stop, each in a link of its own. Early websites did exactly this, and called them sliced images. The pieces have to line up perfectly, a stop rarely sits in a neat square, and every change to the map means cutting it up again.
What Marisol wants is to keep her one picture and lay invisible shapes over it, each shape its own link. Picture a sheet of clear plastic over a paper map, with a shape drawn in marker around each stop: touch inside a shape, and you go where that shape says. The map underneath doesn't change. That's an image map.
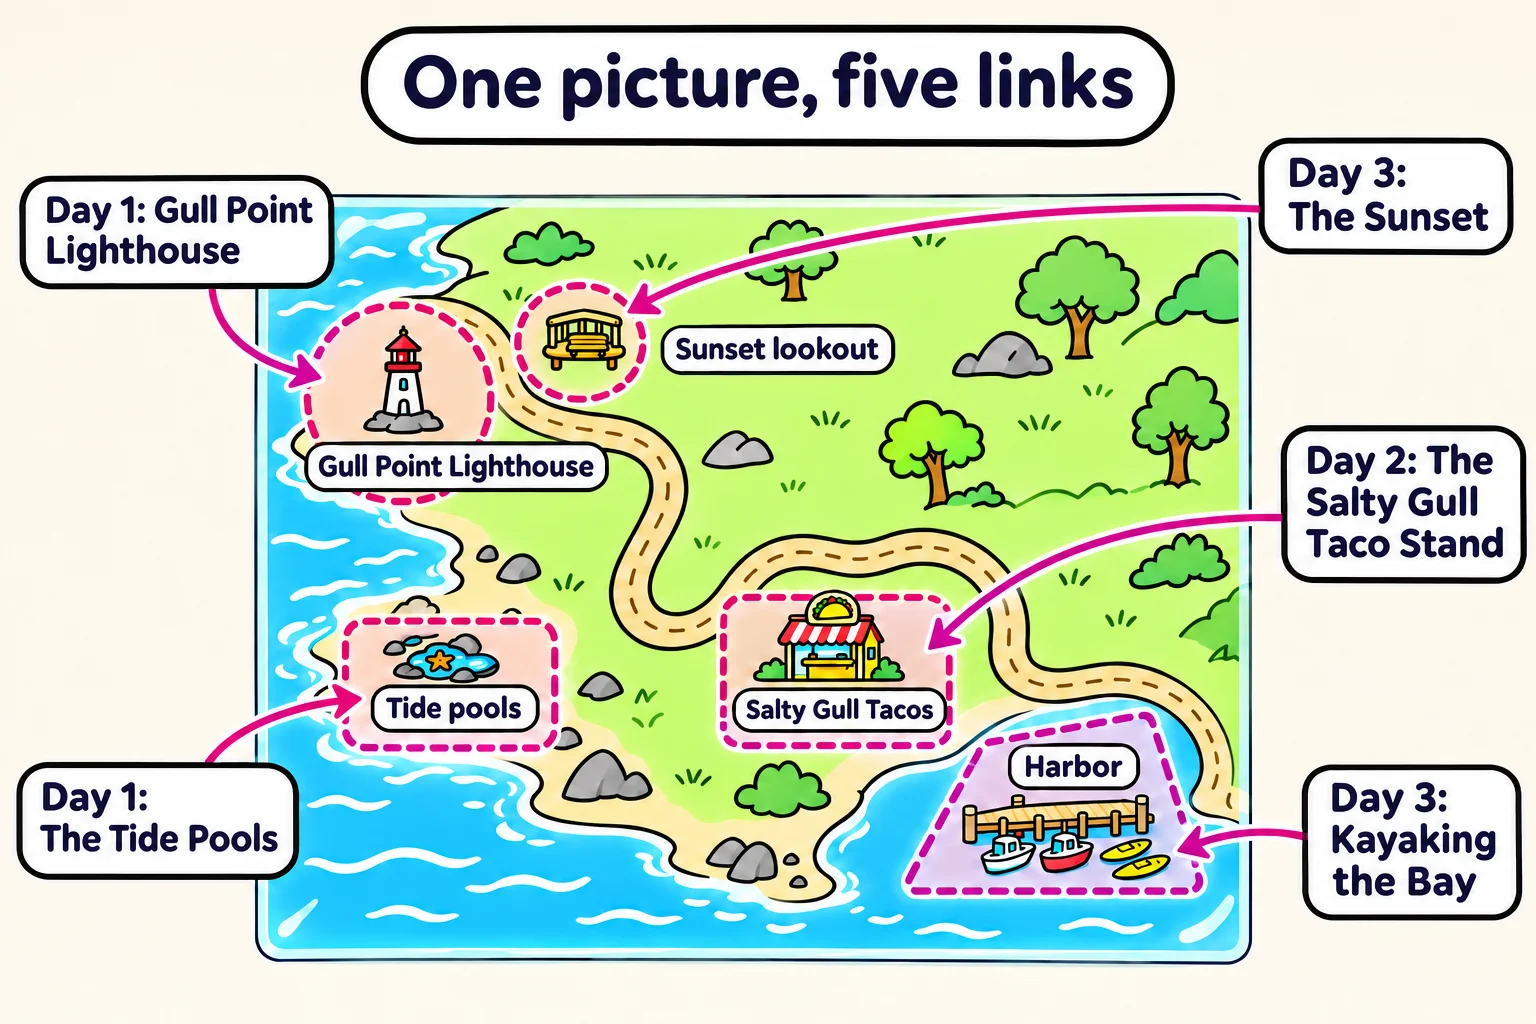
The three parts: usemap, map and area
Here is Marisol's map with three of its stops made clickable:
<img src="images/trip-map.png" alt="Map of the coast road, with the trip's five stops"
     width="640" height="400" usemap="#trip-map">

<map name="trip-map">
  <area shape="circle" coords="120,100,50" href="#lighthouse" alt="Day 1: Gull Point Lighthouse">
  <area shape="rect" coords="300,200,420,280" href="#taco-stand" alt="Day 2: The Salty Gull taco stand">
  <area shape="poly" coords="440,290,600,280,620,380,460,390" href="#kayaking" alt="Day 3: Kayaking the bay">
</map>
Three pieces work together:
<map name="trip-map">is the clear sheet. It holds the shapes, and itsnameis the label you find it by. It shows nothing on the page by itself.- Each
<area>is one shape and one link.shapeandcoordssay where it sits on the picture (the next two sections),hrefsays where it goes, andaltgives it words. Here eachhrefis a link within the page, such as#lighthouse, which jumps to the heading withid="lighthouse", as Links Within a Page, Email and Phone Links showed.<area>is a void element, like<img>: it has no closing tag. usemap="#trip-map"on the<img>, read "use map, hash trip map", lays that sheet over this picture. It's the map's name with a#in front, the same way a link to#lighthousepoints at an id. The name has to match the map'snameexactly. Leave out the#, or misspell the name, and the picture is plain again, with no error message to warn you.
The <map> can go anywhere in the <body>; keeping it right after its picture keeps the two together when you edit the page.
Try it. In your practice folder, make trip.html with a page skeleton and any photo of your own in an images folder, with its real width and height on the <img>. Add usemap="#test-map", then a <map name="test-map"> holding one area, <area shape="rect" coords="0,0,200,150" href="#bottom" alt="Jump to the bottom">, and a heading with id="bottom" at the end of a few paragraphs. Open the page with Live Server and move the pointer over the photo's top-left corner: it turns into a hand. Click it.
Measuring a spot: x and y from the top-left corner
A seat in a theater has two numbers, its row and its seat, and together they find exactly one seat. A spot on a picture also has two numbers, both counted in pixels:
- x is how far across it is from the picture's left edge.
- y is how far down it is from the picture's top edge.
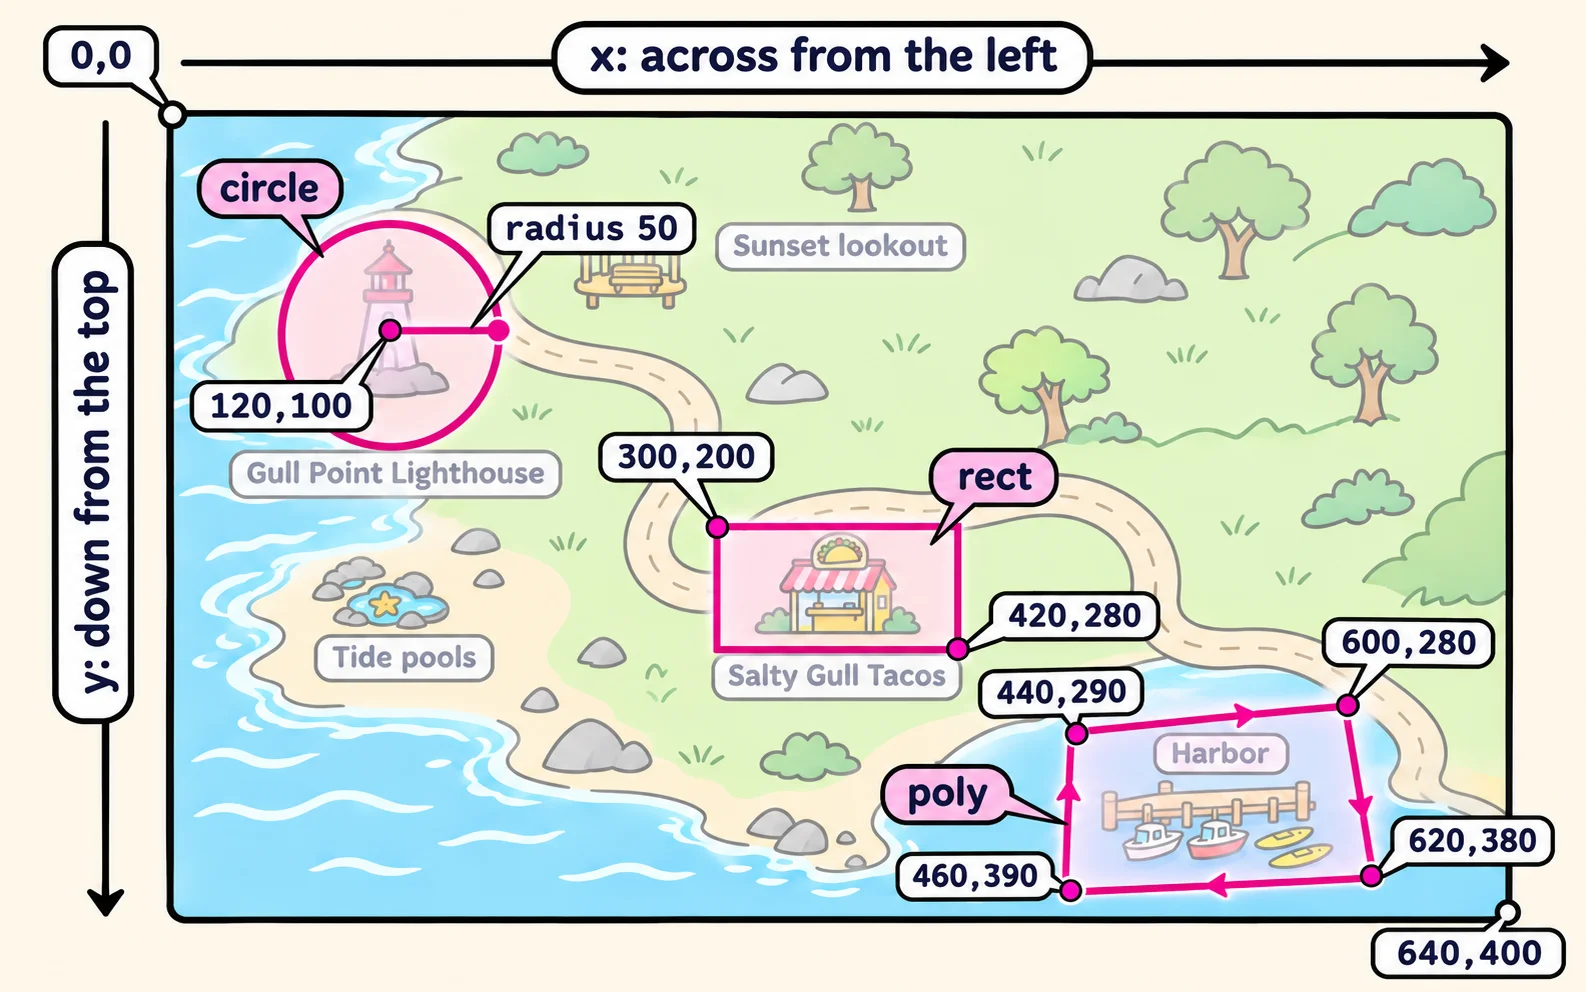
120,100 is read "x 120, y 100": 120 pixels from the left and 100 pixels down. Unlike a graph in math class, y counts down from the top, not up from the bottom. The top-left corner is 0,0, and on the 640-by-400 trip map the bottom-right corner is 640,400.
To find a spot's numbers, open the picture in an image editor and move the pointer over it: most editors show the pointer's position in pixels (Paint, on Windows, shows it in the bar at the bottom). Measure the picture at its real size, the size its width and height say, because the coordinates are pixels of that size.
Three shapes: rect, circle and poly
shape picks the kind of shape, and coords (short for coordinates) gives its numbers. Each shape reads its numbers its own way:
| shape | What its coords are | On the trip map |
|---|---|---|
rect, a rectangle |
The top-left corner's x and y, then the bottom-right corner's: left, top, right, bottom | coords="300,200,420,280": the taco stand, from 300 across and 200 down to 420 across and 280 down |
circle |
The center's x and y, then the radius, the distance from the center to the edge | coords="120,100,50": the lighthouse, everything within 50 pixels of the point 120 across and 100 down |
poly, short for polygon (a shape with straight sides) |
Every corner's x and y, in order around the shape: at least three corners | coords="440,290,600,280,620,380,460,390": the harbor, four corners going around clockwise |
A few rules round it out:
- Commas between the numbers, with no spaces and no
px. rectis the starting value. An area with noshapeis a rectangle.shape="default"takes no coords and covers the whole picture, every part no other area covers: useful for "click anywhere else to open the full-size map".- Where two areas overlap, the one written first wins.
Every area needs alt text
A screen reader can't see shapes on a picture. It reads each <area> as a link, and its alt is the link's name. So an area's alt follows the rule for a picture that is a link, from Alt Text That Helps: it says where the link goes.
<!-- A link with no name: a screen reader may read out the address, or only "link" -->
<area shape="rect" coords="300,200,420,280" href="#taco-stand">

<!-- Says what the shape is, not where it goes -->
<area shape="rect" coords="300,200,420,280" href="#taco-stand" alt="rectangle">

<!-- Says where it goes -->
<area shape="rect" coords="300,200,420,280" href="#taco-stand" alt="Day 2: The Salty Gull taco stand">
An area with an href and no alt is a mistake the HTML validator reports. The keyboard reaches the areas too: Tab moves through them like any other links, in the order they're written in the map, so write them in an order that makes sense, such as the order of the trip. And the picture keeps its own alt, which describes the map as a whole.
The catch: why image maps are rare today
An image map works, and it still leaves people out:
- The spots are invisible. Nothing on the picture says "click here" until the pointer happens to cross a spot and turns into a hand. On a phone there is no pointer at all, so nothing tells a reader the map can be tapped.
- The shapes don't shrink with the picture. The coordinates are pixels of the picture at its full size. When a stylesheet shrinks the picture to fit a phone, as
max-width: 100%does, the picture gets smaller but the shapes stay where they were. Tap the lighthouse on a map squeezed to 320 pixels wide, and you may land in the sea, or on nothing. - CSS can't style the shapes, so you can't outline a spot or color it when the pointer is over it.
So keep an image map for a picture that's shown at its full size, and always give the same links as text near it, for everyone the map leaves out:
<ul>
  <li><a href="#lighthouse">Day 1: Gull Point Lighthouse</a></li>
  <li><a href="#taco-stand">Day 2: The Salty Gull taco stand</a></li>
  <li><a href="#kayaking">Day 3: Kayaking the bay</a></li>
</ul>
Most new sites do this job another way: a list of links like the one above, a separate picture inside each link, or a picture drawn in SVG, whose shapes can be links and do grow and shrink with the picture. Image maps are still worth knowing, because you'll meet them in older pages and on exams, and now you know exactly what to check when you do.
Do it: make the park map clickable
Gull Point Park's page has a map of the park, 600 pixels wide and 400 tall, and visitors keep clicking on it and nothing happens. Make three spots on the map into links to their parts of the page.
Your job:
- Make the map picture use an image map named
park-map. - Add a
<map>namedpark-mapwith one<area>for each spot in the table: itsshape, itscoordsand itshref, written exactly as the table shows them (commas, no spaces). - Give each area alt text that says where it goes: the spot's name from the table.
| Spot | shape | coords | Links to |
|---|---|---|---|
| Gull Point Lighthouse | circle |
150,110,45 |
#lighthouse |
| The keepers' cottage museum | rect |
260,60,400,150 |
#museum |
| The picnic meadow | poly |
80,250,300,230,330,360,60,370 |
#picnic-meadow |
For example, the lighthouse is a circle with its center 150 pixels across and 110 down and a radius of 45, so its area is <area shape="circle" coords="150,110,45" href="#lighthouse" alt="Gull Point Lighthouse">. The checks tick as each part is in place.
Practiced live on the lesson page: write the HTML right there and check it.
Check yourself
2 questions to try on the lesson page.
So what
An image map is three pieces, a usemap, a named <map> and an <area> for each spot, and the shapes are only pixels from the top-left corner. Build one when a picture is shown at its full size, and give its links as text too, so nobody is left clicking a picture that does nothing.