Git Workflow
Create a repository on GitHub, clone it to your computer, and take each change from working to staged, committed and pushed, then pull to stay up to date.
Apprentice · Software Development · Git · Updated
After this lesson you can
- Create a repository on GitHub and copy it to your computer with git clone
- Take a change from working to staged to committed to pushed with git add, git commit and git push, checking each step with git status
- Get new commits from GitHub with git pull, and tell it apart from git fetch
Key takeaways
- git clone copies a GitHub repository to your computer, already connected to GitHub under the name origin.
- A change goes from working to staged with git add, from staged to committed with git commit, and to GitHub with git push.
- git status shows which files are changed, which are staged, and whether you have commits to push or pull.
- git pull downloads new commits from GitHub and adds them to your branch. git fetch only downloads them.
- Pull before you start work and again before you push. A push is rejected when GitHub has commits you don't.
Think about an order from an online store. Someone collects the items, packs them into a box, and hands the box to the shipper. Git works the same way with your changes: you collect the files you changed, pack them into a commit, and ship the commit to GitHub.
In the Setup exercise you made a project on your computer first and published it to GitHub. This lesson goes the other way, the way most projects start: GitHub first, then a copy on your computer.
The commands work the same in Git Bash on Windows and in the Terminal on a Mac. Each example shows the command to type in one box, and what it prints in the next. Copy only the command.
Create a repository on GitHub
Sign in at github.com, click the + at the top right, and choose New repository.

Fill in the form:
- Repository name:
git-demo. - Visibility: Public, so it can be part of your portfolio, or Private if you'd rather keep it to yourself.
- Choose to add a README file. This time GitHub comes first, so let it add the starting files.
- Under Add .gitignore, choose the template for your language: VisualStudio for C#, or Java for Java. A
.gitignorefile lists the files Git should leave out, such as the build output your tools make. - Click Create repository.
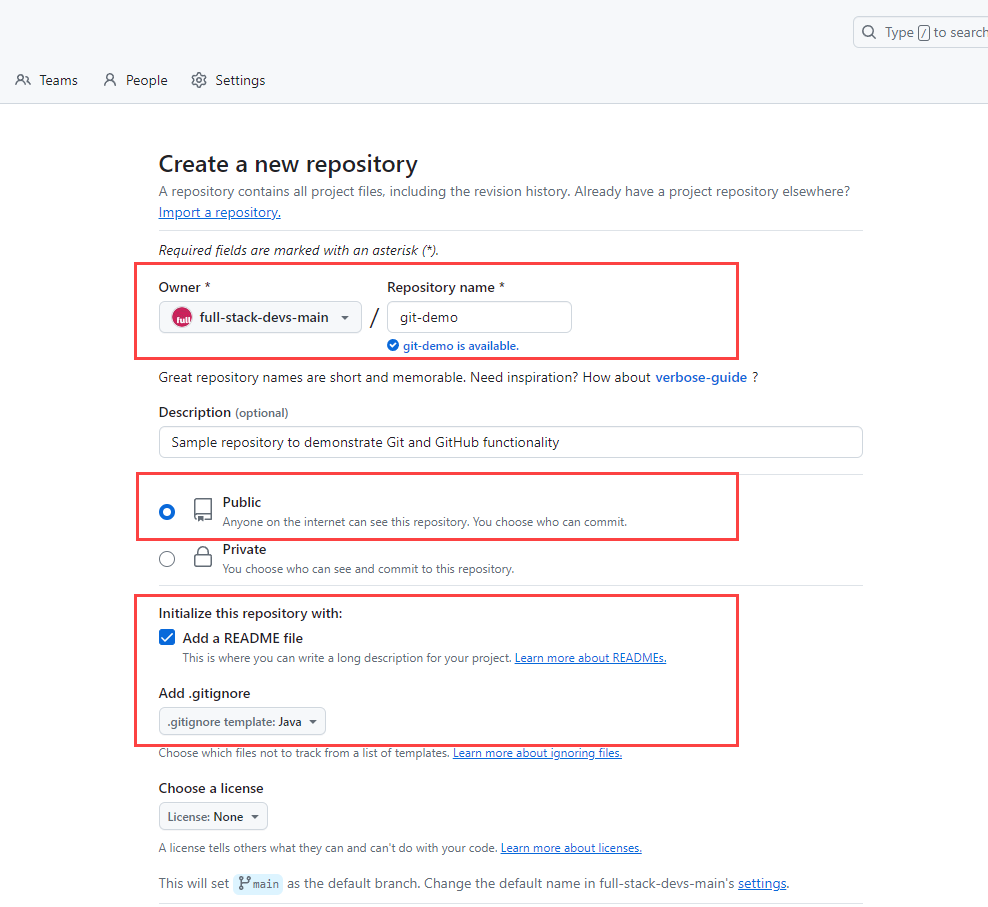
The picture shows the Java template. In the C# course, choose VisualStudio instead.
Clone it to your computer
To clone is to copy a repository from GitHub to your computer, with all of its files and history. On your repository's page, click the green Code button, choose HTTPS, and copy the address.
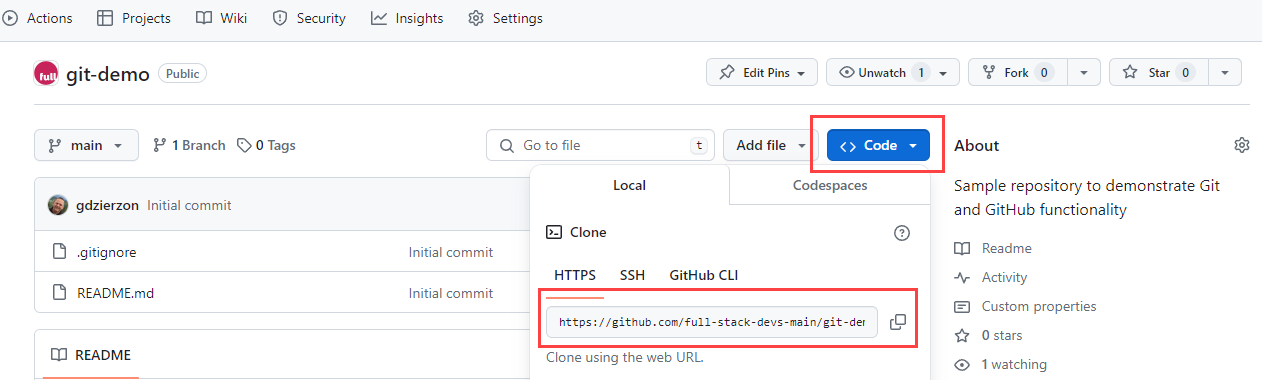
In your terminal, go to your course folder and clone the repository, pasting the address you copied:
cd ~/bootcamp
git clone https://github.com/your-username/git-demo.git
cd git-demo
Your address has your own username. The pictures show a repository owned by an organization instead.
Git prints Cloning into 'git-demo'... and makes a git-demo folder with your README and .gitignore inside. It also remembers where the copy came from, under the name origin, so git push and git pull know where to go. You don't need git remote add for a clone.
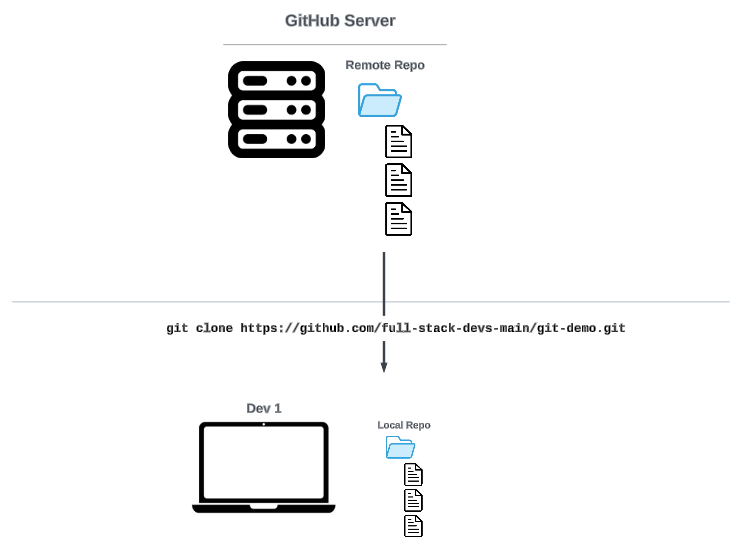
Ask Git how things stand with git status:
git status
On branch main
Your branch is up to date with 'origin/main'.

nothing to commit, working tree clean
Working tree clean means your files match your last commit. Run git status whenever you aren't sure what Git sees.
Working: you change files
Every change starts in working: files you added, changed or deleted since your last commit. Git sees them, but they aren't part of any commit yet. In the store, these are items still on the shelf.
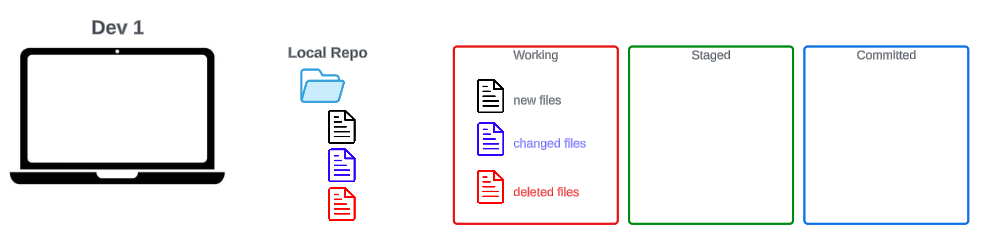
Open the folder in VS Code with code ., then make two changes and save them: add a file named about-me.txt with a sentence about you, and add a line to README.md. Now git status lists both:
On branch main
Your branch is up to date with 'origin/main'.

Changes not staged for commit:
  (use "git add <file>..." to update what will be committed)
  (use "git restore <file>..." to discard changes in working directory)
        modified:   README.md

Untracked files:
  (use "git add <file>..." to include in what will be committed)
        about-me.txt

no changes added to commit (use "git add" and/or "git commit -a")
Modified is a file Git already tracks that has changed. Untracked is a new file Git has never saved.
Staged: git add
The staging area holds the changes that will go into your next commit. In the store, it's the packing table: the items for one order are collected there, but not packed yet.
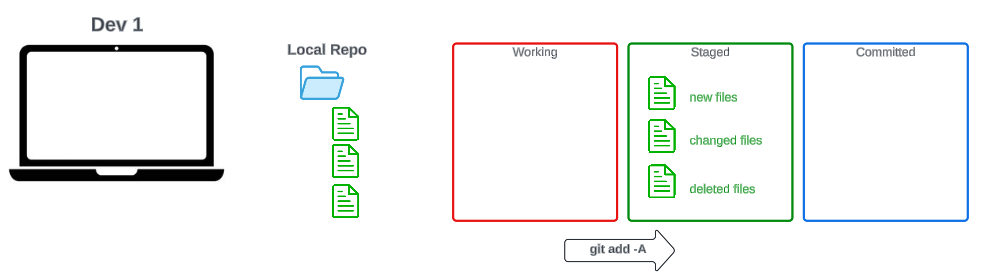
git add -A
git status
On branch main
Your branch is up to date with 'origin/main'.

Changes to be committed:
  (use "git restore --staged <file>..." to unstage)
        modified:   README.md
        new file:   about-me.txt
| Command | What it stages |
|---|---|
git add -A |
Every change in the whole repository: new, changed and deleted files |
git add . |
Every change in the folder you're in and the folders inside it. In the top folder, that's the same as -A. |
git add README.md |
Only that file |
On Windows, git add may also print warning: in the working copy of 'about-me.txt', LF will be replaced by CRLF. That's about how lines end in a text file, and you can ignore it.
Committed: git commit
A commit packs everything staged into one saved snapshot, with a message that says what changed. In the store, the order is now a sealed box, ready for the shipper.
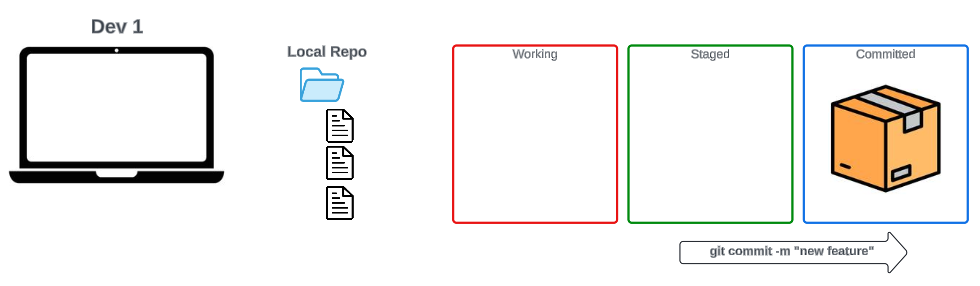
git commit -m "Add about-me and update README"
[main 44cfb1c] Add about-me and update README
 2 files changed, 2 insertions(+)
 create mode 100644 about-me.txt
Your commit gets its own id in place of 44cfb1c. Write a short message that says what you did, such as "Fix the total on the receipt", so you can find the change later. Now git status says:
On branch main
Your branch is ahead of 'origin/main' by 1 commit.
  (use "git push" to publish your local commits)

nothing to commit, working tree clean
Ahead by 1 commit means the commit is saved on your computer, and GitHub doesn't have it yet.
Pushed: git push
git push ships your commits to GitHub. Only commits are sent: a change you haven't committed stays on your computer.
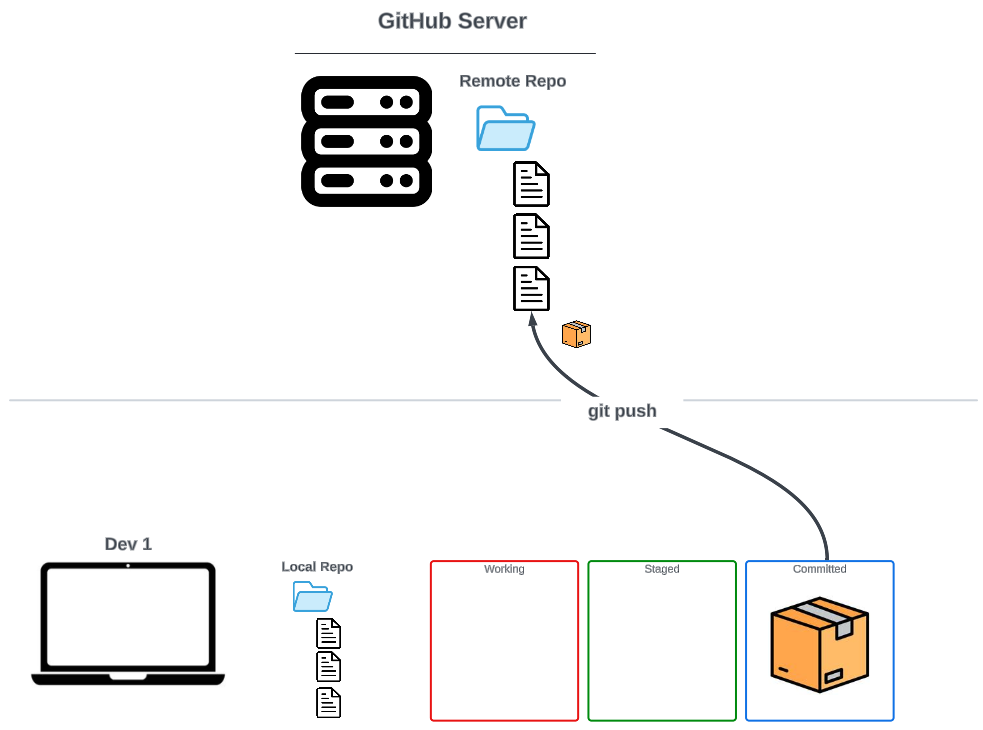
git push
Git prints a few lines that end with main -> main, and git status is back to up to date with 'origin/main'. Refresh your repository on GitHub to see about-me.txt there.
A plain git push works because a cloned branch already knows its place on GitHub. In the Setup exercise you made the repository with git init, so the first push needed git push -u origin main: -u links your main to GitHub's main, once. git push origin main also works here, spelled out in full.
Try it. Change about-me.txt again. Run git status after each step as you add, commit and push it, and watch the file move from Changes not staged to Changes to be committed to ahead by 1 commit to up to date.
Pull: get commits you don't have
Sometimes GitHub has commits your computer doesn't: you edited a file on GitHub's website, you pushed from another computer, or someone else pushed to the repository. git status won't know yet. It compares your branch with the last copy of GitHub that Git downloaded.
git fetch downloads the new commits but leaves your files alone. Then git status can tell you:
git fetch
git status
On branch main
Your branch is behind 'origin/main' by 1 commit, and can be fast-forwarded.
  (use "git pull" to update your local branch)

nothing to commit, working tree clean
git pull does the fetch and then adds the new commits to your branch, so your files change:
git pull
Updating 8a90785..a4ab7b3
Fast-forward
 README.md | 1 +
 1 file changed, 1 insertion(+)
Try it. On GitHub, open README.md, click the pencil to edit it, add a line, and click Commit changes. In your terminal, run git fetch and git status, then git pull, and open README.md to see the new line.
When GitHub rejects your push
If GitHub has a commit you don't, it won't take your push until you have that commit too:
 ! [rejected]        main -> main (fetch first)
error: failed to push some refs to 'https://github.com/your-username/git-demo.git'
Run git pull, then git push again. Because both sides have new commits, Git joins them with a merge commit, and VS Code may open with a message such as Merge branch 'main' of https://github.com/.... Close the file, and Git uses that message.
Branches, briefly
A branch is a separate line of commits. You have been working on main, the branch every repository starts with. Teams make a branch for each new feature, so unfinished work stays off main. You'll see branches on GitHub, in the main button above your files:
git branch
git switch -c add-contact-page
git switch main
git branch lists your branches and marks the one you're on with *. git switch -c creates a branch and moves to it, and git switch main moves back. You may also see git checkout used to switch branches: it does the same job, and more. In this course you work on main.
Your everyday workflow
Commit and push often, not only when an exercise is finished. Each commit is a small step you can go back to, so try to leave your code in a state that builds and runs, even if it isn't done.
# before you start: get anything new from GitHub
git pull

# after a piece of work: stage, commit, pull, push
git add -A
git commit -m "describe your work"
git pull
git push
Common problems
| What you see | What to do |
|---|---|
fatal: not a git repository |
You aren't inside the repository's folder. cd into it, such as cd ~/bootcamp/git-demo. |
nothing added to commit but untracked files present |
Nothing is staged yet. Run git add -A, then commit. |
nothing to commit, working tree clean when you expected changes |
The file isn't saved. Save it in VS Code, then run git status again. |
! [rejected] main -> main (fetch first) |
GitHub has commits you don't. Run git pull, then git push. |
fatal: Need to specify how to reconcile divergent branches (on a Mac) |
Run git config --global pull.rebase false once, then git pull again. |
fatal: destination path 'git-demo' already exists |
You cloned it already. cd git-demo and work there. |
Check yourself
2 questions to try on the lesson page.
So what
Pull, change, add, commit, push: this loop is most of the Git a developer uses every day, and every exercise in this course is saved and shared with it.